
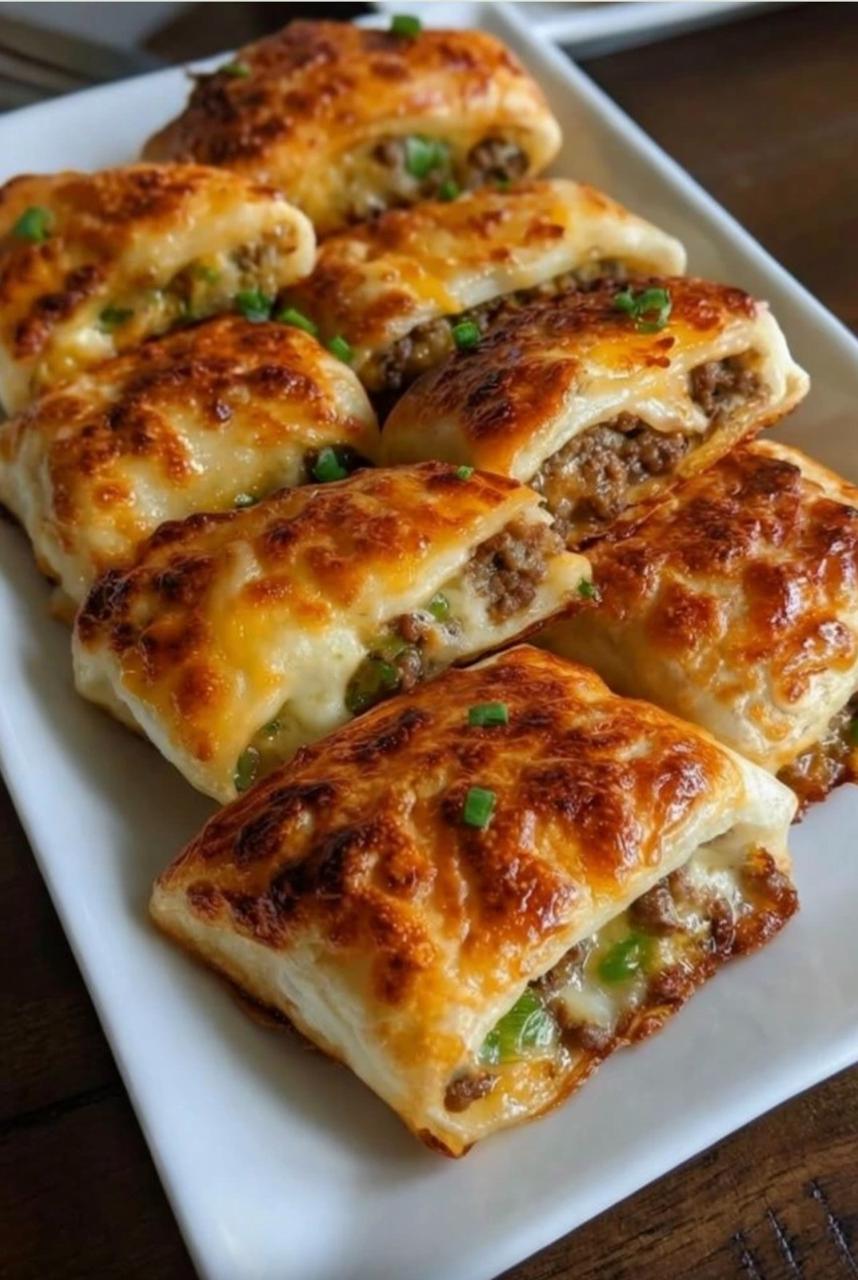
The genius of this recipe is the cream cheese layer. Where most taco recipes rely on shredded cheese alone, these pockets use a mixture of softened cream cheese and salsa spread across the tortilla before the beef goes on top. As the pockets bake, this mixture melts into a creamy, tangy sauce that binds the filling together and gives every bite a richness that plain ground beef and cheddar alone cannot achieve. The result is more cohesive, more flavorful, and genuinely better than you might expect from something made in under thirty minutes with five main ingredients. Brushing the outside of each pocket with melted butter before baking is the final touch — it creates a golden, slightly crispy exterior that makes the contrast with the molten interior even more satisfying.
Ingredients
1 pound (450 grams) ground beef — lean or extra lean works well; drain off excess fat after browning. Ground turkey or chicken can be substituted for a lighter version with no other changes to the recipe
1 packet (about 1 ounce) taco seasoning — store-bought is convenient and consistent; if you prefer to make your own, combine 1 tablespoon chili powder, 1 teaspoon cumin, 1 teaspoon garlic powder, half a teaspoon paprika, half a teaspoon onion powder, a pinch of cayenne, and salt and pepper to taste
8 ounces (225 grams) cream cheese, softened to room temperature — this is the base of the creamy filling and must be fully softened before mixing; cold cream cheese will not blend smoothly with the salsa
Half a cup (about 120 ml) salsa — use mild, medium, or hot depending on your preference; the salsa provides both flavor and moisture for the cream cheese mixture, and the spice level of the salsa is the primary way to control the heat of the finished pocket. A chunky fresh salsa or a smoother jarred variety both work well
1 cup (about 115 grams) shredded cheddar cheese, plus extra for topping — freshly shredded melts more evenly than pre-shredded; Monterey Jack, pepper jack, a Mexican cheese blend, or mozzarella can all be substituted or combined
2 tablespoons unsalted butter, melted — this is brushed on the outside of each pocket before baking and is responsible for the golden, slightly crispy exterior
12 small flour tortillas — flour tortillas hold together better than corn tortillas when folded and baked; small (6-inch) tortillas produce a pocket-sized result that is easy to pick up and eat. Warm the tortillas briefly in the microwave or in a dry pan before filling to prevent cracking when folded
Suggested Toppings (served after baking)
Shredded lettuce, diced tomatoes, sour cream, extra salsa, sliced black olives, sliced jalapeños, guacamole or diced avocado, chopped fresh cilantro, sliced green onions, pickled red onion. None of these are added before baking — they go on after, which means each person at the table can customize their own pocket exactly as they like it.
Instructions
Step 1: Cook the Beef
In a large skillet over medium-high heat, brown the ground beef, breaking it up into small pieces as it cooks. Cook until no pink remains — approximately 7 to 10 minutes depending on the thickness of your skillet. Drain off any excess fat. Add the taco seasoning and follow the packet instructions, which typically involve adding a small amount of water and stirring over medium heat for a few minutes until the seasoning has coated the meat evenly and the liquid has largely evaporated. Set aside to cool slightly while you prepare the cream cheese mixture and preheat the oven.
Step 2: Make the Cream Cheese Filling
Preheat your oven to 350 degrees Fahrenheit (175 degrees Celsius). In a medium bowl, beat the softened cream cheese with an electric hand mixer or a sturdy fork until completely smooth. Add the salsa and mix until the two are fully combined into a creamy, spreadable mixture with no visible lumps of cream cheese. The mixture should be thick but spreadable — if it seems too stiff, add a tablespoon more salsa and mix again.
Advertisement
Step 3: Assemble the Pockets
Line a baking sheet with parchment paper or lightly spray with cooking spray. Warm the flour tortillas briefly if needed to make them pliable — 15 to 20 seconds in the microwave wrapped in a damp paper towel works well. Lay a tortilla flat on a clean work surface. Spread a generous spoonful of the cream cheese mixture across the center, leaving about an inch of border around the edges. Spoon a portion of the seasoned ground beef over the cream cheese layer, then top with a handful of shredded cheddar cheese. To fold: bring the bottom edge of the tortilla up over the filling, fold in the sides, then roll upward like a burrito — or fold the tortilla in half over the filling and use a fork to crimp the edges, creating a half-moon pocket shape. Either approach works; the key is to tuck the edges securely so the filling does not escape during baking. Place each assembled pocket seam-side down on the prepared baking sheet. Repeat with the remaining tortillas and filling.
Step 4: Brush and Bake
Using a pastry brush or a spoon, brush the tops and sides of each assembled pocket with the melted butter. This step is not optional — the butter is what gives the finished pockets their golden color, slight crispiness, and the richly satisfying exterior that contrasts so well with the creamy filling. If desired, sprinkle a small amount of additional shredded cheese over the tops before they go into the oven. Bake for 15 minutes, until the tortillas are golden brown and the cheese inside is visibly melted at the edges. Allow to cool for 2 to 3 minutes before serving — the filling will be very hot immediately out of the oven.
Step 5: Add Toppings and Serve
Arrange the baked pockets on a serving platter alongside small bowls of toppings — sour cream, extra salsa, shredded lettuce, diced tomatoes, and guacamole are the most popular accompaniments. Each person can add whatever they like. These are best eaten warm, when the exterior is at its crispiest and the cheese inside is still molten. Set out napkins — they are handheld, but the filling is generous.
Tips for the Best Result
Warming the tortillas before filling prevents cracking when you fold them. Cold flour tortillas are significantly more likely to split at the fold, which causes filling to spill during baking. A quick 15 seconds in the microwave wrapped in a damp paper towel, or 30 seconds in a dry skillet over medium heat, makes them pliable enough to fold without tearing. Do not overfill — the pockets should be generous but not so stuffed that they cannot be folded shut. A tablespoon or two of cream cheese mixture and a similar amount of beef per tortilla is the right proportion; too much filling prevents the edges from sealing properly.
These pockets can be assembled up to 24 hours in advance, covered, and refrigerated before baking. Remove from the refrigerator 15 minutes before baking to take the chill off and ensure even cooking. They can also be frozen before baking — arrange on a baking sheet, freeze until solid, then transfer to a freezer bag and store for up to one month. Bake from frozen at 350°F for approximately 20 to 25 minutes, adding a few extra minutes over the standard time to account for the frozen starting temperature.
Leftovers reheat best in the oven. Place them on a baking sheet at 350°F for about 10 minutes until warmed through — this preserves the crispy exterior. Microwaving works in a pinch but softens the tortilla significantly. Refrigerated leftovers keep well for up to four days in an airtight container.
Why These Work for Any Occasion
The pocket format solves the most persistent practical problem with tacos: structural integrity. Traditional tacos, whether hard-shell or soft, have a tendency to collapse midway through eating, depositing their contents on whatever surface is nearby. Pocket tacos hold everything inside a sealed, baked shell that does not break apart. They are genuinely easy to eat standing up, which makes them practical for game day spreads, potlucks, backyard gatherings, and school lunches that travel well in foil. They scale up without complication — doubling or tripling the recipe requires only additional tortillas, beef, and cheese. And the topping-on-the-side format means that people with different preferences — those who cannot tolerate spice, those who dislike a particular topping, those with dietary restrictions that affect certain garnishes — can all eat the same pockets and customize from a shared spread of accompaniments. It is the kind of recipe that requires almost nothing from the cook but delivers reliably excellent results every time.
ADVERTISEMENT

